Your Phone Is Enough — But Here Is How to Do It Right
A hot air balloon ride over Marrakech is one of the most photogenic experiences in Morocco. Golden hour light, snow-capped Atlas Mountains, colourful balloons rising against a pink sky, the Moroccan landscape unfolding 1,000 metres below — it is a photographer's paradise.
The good news: you do not need expensive gear. Modern smartphones handle golden hour light beautifully, and the conditions from a balloon basket are far more forgiving than you might think. What matters more than your equipment is knowing what to shoot, when to shoot it, and how to avoid the handful of mistakes that ruin otherwise great shots.
These hot air balloon photography tips will help you come home with images worth printing, posting and remembering — whether you are shooting on the latest iPhone, a mirrorless camera or a GoPro.
Gear: What to Bring and What to Leave Behind
Your Phone
For 90% of guests, a smartphone is the only camera you need. The wide-angle lenses on modern phones are excellent for sweeping landscape shots, portrait mode handles people beautifully against a blurred background, and the automatic HDR processing in recent iPhones and Samsung Galaxy phones does a remarkable job of balancing a bright sky against a darker landscape below.
A few essentials:
- Charge to 100% before you leave the hotel. Battery life drops faster in cold morning air, and you will be shooting continuously for 45 to 60 minutes. Bring a small power bank in your pocket if your phone is older.
- Clean the lens. This sounds trivial, but fingerprint smudges cause haze and flare — especially when shooting toward the sun during golden hour. A quick wipe with your shirt before takeoff makes a visible difference.
- Enable HDR mode. On iPhones, leave Smart HDR or Photographic Styles turned on. On Android, enable HDR in your camera settings. This is critical when the sunrise sky is bright but the ground is still in shadow.
DSLR or Mirrorless Camera
If you are a serious photographer, a dedicated camera absolutely earns its place in the basket. The dynamic range of a proper sensor at sunrise is noticeably superior to any phone, and the ability to shoot RAW gives you far more flexibility in post-processing.
Lens recommendations:
- Wide-angle zoom (16-35mm): Your primary lens. This captures the full sweep of the landscape, fits multiple balloons in the frame, and handles the tight quarters of the basket well. If you only bring one lens, bring this.
- Telephoto zoom (70-200mm or 70-300mm): Useful for isolating distant balloons, picking out details in the landscape below (villages, camel caravans, palm groves), and compressing the Atlas Mountains behind other balloons for dramatic effect.
- Skip the tripod. There is no room in the basket, and you do not need one. Shutter speeds are fast enough in sunrise light, and the basket itself vibrates when the burner fires — a tripod would actually make things worse.
GoPro or Action Camera
A GoPro is a fantastic companion for a balloon ride, especially for video. The ultra-wide field of view captures the full basket, the balloon envelope above, and the landscape below in a single frame. Mount it on a short selfie stick and hold it outside the basket edge for a dramatic perspective that no phone or camera can match.
Set it to 4K at 30fps for video, or use TimeWarp mode for a stabilised time-lapse of the entire flight. The result is stunning and requires zero skill.
What NOT to Bring
Drones are strictly prohibited. Multiple balloons are in the air simultaneously, often within a few hundred metres of each other. A drone at altitude would be an immediate collision risk to other aircraft and passengers. Aviation regulations in Morocco prohibit drone operation anywhere near balloon launch sites. Leave it at the hotel — no exceptions.
One Non-Negotiable: Use a Wrist Strap
Attach a wrist strap or lanyard to your phone or camera. The basket walls come up to your chest, and you will be leaning over the edge, holding your phone at angles, and turning quickly when something catches your eye. Dropping a phone from 500 to 1,000 metres is permanent. A 3-dirham wrist strap from the Marrakech medina is the cheapest insurance you will ever buy.
Camera Settings for DSLR and Mirrorless
If you are shooting on a dedicated camera, these settings will get you sharp, well-exposed images from takeoff to landing.
Shoot in RAW
Always. The dynamic range at sunrise — bright sky, dark ground, intense colour gradients — is exactly the scenario where RAW files give you recovery options that JPEG cannot. You will thank yourself when editing the highlights back into an overexposed sunrise or pulling shadow detail from a village below.
ISO
Start at ISO 400 during the pre-dawn inflation and early ascent. As the sun rises and light increases rapidly, drop to ISO 200 and then ISO 100. If you are shooting in aperture priority mode, the camera will handle this automatically — just keep an eye on your shutter speed (see below).
Aperture
- f/8 for landscape shots where you want everything sharp from the basket edge to the Atlas Mountains on the horizon. This is your default.
- f/4 to f/5.6 when photographing other balloons or people in the basket, where you want a slightly shallower depth of field to separate the subject from the background.
Shutter Speed
This is where balloon photography differs from regular landscape work. The burner fires periodically, and each blast sends a vibration through the entire basket. A shutter speed of 1/250s minimum eliminates any motion blur from these vibrations. In bright sunrise light, you will naturally hit 1/500s or faster at f/8, so this is rarely a problem — but keep an eye on it during the darker early minutes.
White Balance
Set it to Daylight or Cloudy. Both produce warm, golden tones that match the natural quality of sunrise light. Auto white balance tends to neutralise the warmth, which defeats the purpose. If you are shooting RAW, you can adjust this in post — but getting it right in camera means your LCD previews will look accurate, helping you judge exposure in the field.
Phone Photography Tips
You do not need manual controls to get excellent shots from your phone. These techniques work on any modern smartphone.
Use the 0.5x Ultra-Wide Lens
Switch to the 0.5x (ultra-wide) camera for landscape shots. This is the single most impactful phone photography tip for balloon rides. The standard 1x lens is too tight to capture the enormity of the scene. The ultra-wide pulls in the full panorama — the basket edge, multiple balloons, the horizon, and the landscape below — in a single frame.
Portrait Mode for People
When photographing your partner, your group, or fellow passengers with the scenery behind them, switch to portrait mode. The computational blur separates the person from the background beautifully, and the golden hour light creates natural warmth on skin tones. Position people against the sky or the Atlas Mountains for the best contrast.
Burst Mode During Key Moments
Hold down the shutter button (or the volume button) to fire burst mode during the inflation, the moment of liftoff, and the seconds when other balloons rise into the frame alongside you. These moments happen fast, and burst mode ensures you capture the peak instant rather than a half-second too late.
Tap to Focus, Then Adjust Exposure
Tap the horizon line to set focus, then swipe down slightly on the exposure slider (the sun icon on iPhone) to darken the exposure by about half a stop. This prevents the sky from blowing out to white and preserves the rich colour in the sunrise. The foreground will be slightly darker, but the overall image will look dramatically better.
Use Panorama Mode
Panorama mode works beautifully from a balloon basket. The slow, steady rotation of the balloon actually helps you sweep smoothly across the landscape. Start from one side and pan slowly to the other. The result is a single ultra-wide image that captures the full 180-degree view — the Atlas Mountains, the palm groves, the desert, and the city in one shot.
What to Photograph: The 10 Key Moments
A balloon flight over Marrakech follows a predictable sequence, and each stage offers distinct photographic opportunities. Knowing what is coming lets you be ready rather than reactive.
1. The Inflation Process
The crew lays out the enormous envelope on the ground and uses industrial fans and burner blasts to inflate it. The balloon slowly rises from flat fabric to a towering structure. This is visually dramatic — the scale of the balloon against the small human figures, the flames illuminating the interior fabric, the pre-dawn sky behind. Get close during the safety briefing and shoot wide.
2. The Moment of Liftoff
The basket lifts gently off the ground and the earth drops away below you. Shoot a short video clip here — the smooth, silent ascent with the ground receding is something photos cannot fully convey. Point the camera straight down over the basket edge as you rise.
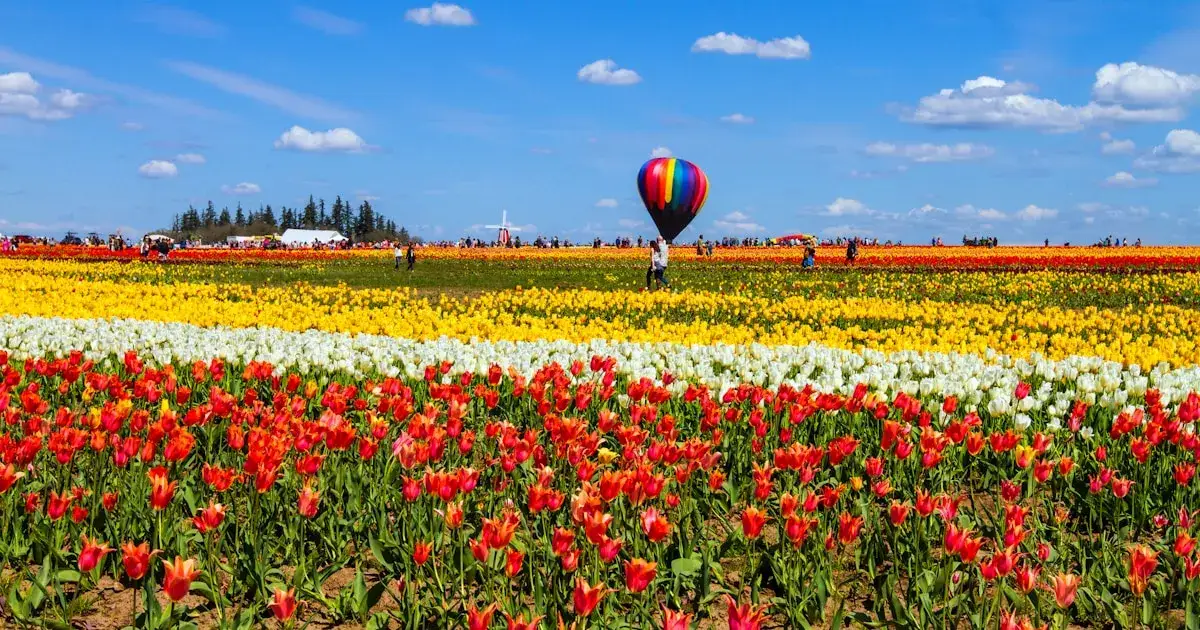
3. Other Balloons Rising Alongside You
Multiple balloons launch from the same area within minutes of each other. As you climb, you will see three to eight other balloons at various altitudes around you, their colours vivid against the pink and gold sky. These shots are the iconic Marrakech balloon images — the ones that look like they belong on a travel magazine cover. Use your telephoto or zoom in on your phone to isolate individual balloons.
4. Sunrise Over the Atlas Mountains
The moment the sun crests the Atlas range is the single most beautiful instant of the entire flight. The mountains go from silhouette to glowing amber in about 90 seconds. Be ready with burst mode. This light lasts perhaps five to seven minutes at peak intensity before becoming ordinary daylight.
5. The Landscape Below
Villages, palm groves, riverbeds, agricultural patterns, desert terrain — the view straight down is endlessly fascinating. Lean over the basket edge (with your wrist strap on) and shoot directly downward. The geometric patterns of Moroccan agriculture from 500 metres look like abstract art. For a detailed guide to what you will see below, read our post on what you see from a hot air balloon in Marrakech.
6. Inside the Balloon Envelope
Look straight up from inside the basket. The interior of the balloon is a cathedral of colour — translucent fabric panels glowing with sunrise light, the structural lines converging at the apex. This is a shot most people forget to take, and it is one of the most striking.
7. The Burner Flame
When the pilot fires the burner, a column of flame shoots upward into the envelope. Capture it against the blue sky for a dramatic contrast. Video works especially well here — the roar of the flame paired with the visual is visceral.
8. Your Group with the View Behind
Do not forget the human element. Ask a fellow passenger or the pilot to take a photo of you and your partner or group with the landscape and other balloons behind you. These are the photos you will actually frame and display. If photography is a priority for your trip, consider our Private Flight — fewer people in the basket means more room to move, better angles, and no strangers in your background shots.
9. The Shadow of Your Balloon
When the sun is low and behind you, your balloon casts a perfect, sharp shadow on the ground below. It stretches across fields and villages, and it is one of the most uniquely "balloon" images you can capture. Look for it in the first 15 to 20 minutes after sunrise, when the sun angle is steep enough to project a long shadow.
10. The Breakfast Spread After Landing
After touchdown, a traditional Moroccan breakfast is laid out — fresh bread, local honey, olive oil, soft cheese, fruit and mint tea, typically served on colourful blankets in a palm grove or desert clearing. The food, the setting and the deflated balloons in the background make for a beautiful final shot.
Composition Tips That Make the Difference
Technical settings get you a sharp, well-exposed image. Composition is what makes it memorable.
Include the basket edge or ropes. Framing your shot with a piece of the basket rim, the ropes rising to the envelope, or a fellow passenger's silhouette immediately tells the viewer "this was taken from a balloon." Without that context, aerial landscape shots could be taken from anywhere.
Use other balloons as foreground interest. A landscape photo with a colourful balloon floating in the middle distance is infinitely more compelling than the same landscape without one. Position yourself so other balloons fall between you and the Atlas Mountains or the sunrise.
Shoot both vertical and horizontal. Vertical (portrait orientation) shots are ideal for Instagram stories and reels. Horizontal (landscape orientation) shots are better for prints, desktop wallpapers and blog posts. Consciously alternate between both throughout the flight so you have options later.
Golden hour light does the heavy lifting. During the 15 to 20 minutes around sunrise, every photo looks warm, flattering and cinematic. You do not need filters, post-processing tricks or special techniques. The light is doing all the work. Just point and shoot during this window and you will be amazed at the results.
Video Tips
Still photos are essential, but short video clips from a balloon ride are often even more shareable and emotionally powerful.
Slow, steady pans. The temptation is to whip the camera around trying to capture everything. Resist it. Start on one subject — a balloon, the mountains, the landscape — and pan slowly and smoothly to another. A five-second steady pan is worth more than thirty seconds of jerky movement.
Capture the ambient sound. The audio from a balloon ride is extraordinary and something photos cannot convey. Silence — genuine, profound silence — punctuated by the roar of the burner, roosters crowing from the villages below, and occasionally the call to prayer drifting up from a distant mosque. Record at least one 30-second clip with no talking, just the natural soundscape. It will transport you back to the moment every time you replay it.
Time-lapse the sunrise. If you have a GoPro or can prop your phone securely against the basket edge, set a time-lapse running for the 10 to 15 minutes around sunrise. The result — the sky shifting from indigo to pink to gold, balloons rising and drifting, the landscape brightening — is consistently one of the most stunning pieces of content guests create. For more on the sunrise itself, see our sunrise guide.
Common Mistakes to Avoid
Spending the Entire Flight Behind a Screen
This is the number one mistake, and it is worth stating bluntly. You are floating 1,000 metres above Morocco at sunrise. The view is extraordinary. The silence is unlike anything you have experienced. If you spend 45 minutes looking at a 6-inch screen instead of the actual horizon, you will regret it.
Shoot actively for the first 15 to 20 minutes when the light is at its best and the key moments (inflation, liftoff, sunrise) are happening. Then put the phone in your pocket for at least 10 minutes. Just look. Breathe. Be present. Pick the camera back up later for the descent and landing. Your photos will actually be better for it — you will shoot with more intention and less desperation.
Only Shooting Landscapes
Wide landscape shots are beautiful, but they all start to look the same after the tenth one. The photos you will value most in five years are the ones with people in them — your partner's face lit by golden light, your friend laughing as the burner fires, your group leaning over the basket edge pointing at something below. Alternate between landscapes and human moments.
Forgetting the Breakfast
The flight is the main event, but the traditional Moroccan breakfast served after landing is photogenic, unique and part of the complete experience. The colourful blankets, the mint tea glasses, the food spread with deflated balloons and the Atlas Mountains in the background — this is content gold, and many guests pocket their phones after landing and miss it entirely.
Ignoring the Preparation for What to Wear
Cold hands make it nearly impossible to operate a camera or phone effectively. If you are flying in winter and your fingers are numb, every photo opportunity becomes a fumbled struggle. Check our guide to what to wear on a balloon ride and bring thin gloves you can remove quickly for shooting.
Book a Flight Built for Photography
Every flight we operate launches at the optimal time for golden hour light, and our pilots position the balloon to give passengers the best views of the Atlas Mountains and surrounding landscape.
Our Classic Flight is perfect for most guests — you will share the basket with a small group and have plenty of room to move and shoot. If photography is a serious priority and you want maximum freedom, our Private Flight gives your group the entire balloon. Fewer people means unobstructed angles, no strangers in your shots, and the ability to ask the pilot to rotate the basket for specific compositions.
Both flights include hotel pickup, the full sunrise experience, and a traditional Moroccan breakfast after landing. Bring your camera, bring a wrist strap, and come home with images you will never stop sharing.